搜索到
51
篇与
的结果
-
 在Typecho文章底部添加打赏功能的实现 添加CSS样式#QR { padding-top:20px; } #QR a { border:0 } #QR img { width:100px; max-width:100%; display:inline-block; margin:.8em 2em 0 2em } #rewardButton { border:1px solid #ccc; line-height:36px; text-align:center; height:36px; display:block; border-radius:4px; -webkit-transition-duration:.4s; transition-duration:.4s; background-color:#fff; color:#999; margin:0 auto; padding:0 25px } #rewardButton:hover { color:#f77b83; border-color:#f77b83; outline-style:none }找到当前主题下的 post.php 在适当的位置添加代码<div style="padding: 10px 0; margin: 20px auto; width: 100%; font-size:16px; text-align: center;"> <button id="rewardButton" disable="enable" onclick="var qr = document.getElementById('QR'); if (qr.style.display === 'none') {qr.style.display='block';} else {qr.style.display='none'}"> <span>打赏</span></button> <div id="QR" style="display: none;"> <div id="wechat" style="display: inline-block"> <a class="fancybox" rel="group"> <img id="wechat_qr" src="http://2025ly.cn/usr/themes/maupassant-master/img/wx.png" alt="WeChat Pay"></a> <p>微信打赏</p> </div> <div id="alipay" style="display: inline-block"> <a class="fancybox" rel="group"> <img id="alipay_qr" src="http://2025ly.cn/usr/themes/maupassant-master/img/zfb.png" alt="Alipay"></a> <p>支付宝打赏</p> </div> </div> </div>
 -
-
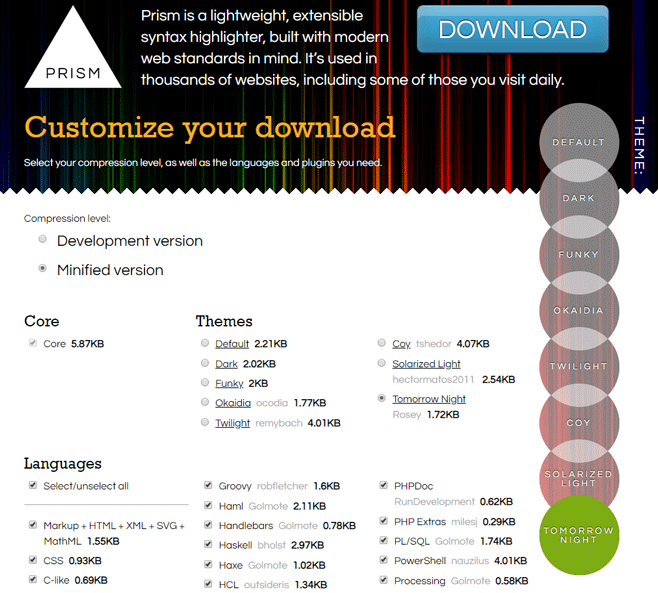
通过prism.js实现Typecho代码语法高亮 实现方法 进入prism.js官网的下载页面,Compression level一般选Minified version;Themes根据自己喜好选择;Languages选要用的就好了;全选的话js文件有320KB+,比较大;Plugins按需选择,全选的多个50KB左右。都选好了就可以下载js和css文件了。可以将下载好的js和css文件上传到Typecho的主题目录,即“usr/themes/主题名”目录下,然后登陆进入Typecho的后台,“控制台" --> “外观” --> "编辑当前外观",编辑header.php文件,在标签内插入如下代码:<link rel="stylesheet" href="<?php $this->options->themeUrl('prism.css');?>" /> <script src="<?php $this->options->themeUrl('prism.js');?>"></script>保存文件即可生效。在使用Markdown写文章时,只要在代码块标记`标记后面添加你的代码的语言名,如php、html、python等,就可以实现代码高亮展示。
-
Typecho在百度BCH的Rewrite规则 用文本工具创建一个“bcloud_nginx_user.conf”文件,最好使用UTF-8编码Typecho中输入:if (-f $request_filename/index.html){ rewrite (.*) $1/index.html break; } if (-f $request_filename/index.php){ rewrite (.*) $1/index.php; } if (!-f $request_filename){ rewrite (.*) /index.php; }保存后用FTP将“bcloud_nginx_user.conf”文件上传到根目录,即“webroot”文件夹。在百度云虚拟主机控制面板重新加载服务服务加载完成后,伪静态规则就生效了,访问伪静态后的网页就正常了。
-
加载时间 在 functions.php 中加入以下代码: /** * 加载时间 * @return bool */ function timer_start() { global $timestart; $mtime = explode( ' ', microtime() ); $timestart = $mtime[1] + $mtime[0]; return true; } timer_start(); function timer_stop( $display = 0, $precision = 3 ) { global $timestart, $timeend; $mtime = explode( ' ', microtime() ); $timeend = $mtime[1] + $mtime[0]; $timetotal = number_format( $timeend - $timestart, $precision ); $r = $timetotal < 1 ? $timetotal * 1000 . " ms" : $timetotal . " s"; if ( $display ) { echo $r; } return $r; }然后,在模板中引用:<?php echo timer_stop();?>前台输出相关统计1.<?php Typecho_Widget::widget('Widget_Stat')->to($stat); ?> 2.<p><?php _e('氪星人自 <strong>2013</strong> 年建站以来,截至 %s 在设定的 <strong>%s</strong> 个分类 3.和 <strong>%s</strong> 个页面中, 4.发布了 <strong>%s</strong> 篇文章,收到了 <strong>%s</strong> 条评论。 5.', date('Y年n月j日G时i分'), $stat->categoriesNum, $stat->publishedPagesNum, $stat->publishedPostsNum, $stat->publishedCommentsNum); ?></p>文章字数统计在主题的functions.php中写入代码: function art_count ($cid){ $db=Typecho_Db::get (); $rs=$db->fetchRow ($db->select ('table.contents.text')->from ('table.contents')->where ('table.contents.cid=?',$cid)->order ('table.contents.cid',Typecho_Db::SORT_ASC)->limit (1)); echo mb_strlen($rs['text'], 'UTF-8'); } 然后在想要添加的地方之间加调用就ok <?php echo art_count($this->cid); ?>总访客数统计代码 functions.php 中,添加以下统计代码//总访问量 function theAllViews() { $db = Typecho_Db::get(); $row = $db->fetchAll('SELECT SUM(VIEWS) FROM `typecho_contents`'); echo number_format($row[0]['SUM(VIEWS)']); } 然后在你需要显示的位置(如:footer.php sidebar.php 等)插入以下调用代码 <?php echo theAllViews();?></span><?php _me("访客总数") ?>添加版权声明<blockquote> <strong>本文作者:</strong><a target="_blank" href="https://www.2025ly.com">ly's Blog</a> <br><br> <strong>本文链接:</strong><a target="_blank" href="<?php $this->permalink() ?>"><?php $this->title() ?> - <?php $this->permalink() ?></a> <br><br> <strong>版权声明:</strong>如无特别声明,本文即为原创文章,仅代表个人观点,版权归 <a href="<?php $this->options->siteUrl(); ?>" target="_blank"><?$this->options->title();?></a> 所有,未经允许不得转载! </blockquote>
-
typecho模板常用代码 站点动态标题<?php $this->archiveTitle(array( 'category'=>_t('分类 %s 下的文章'), 'search'=>_t('包含关键字 %s 的文章'), 'tag' =>_t('标签 %s 下的文章'), 'author'=>_t('%s 的主页') ), '', ' - '); ?>站点地址,名称与描述<?php $this->options->siteUrl(); ?>//站点地址 <?php $this->options->title(); ?>//名称 <?php $this->options->description() ?>//描述index.php文章循环输出<?php if ($this->have()): ?>//判断文章存在与否 <?php while($this->next()): ?>//开始循环 <a href="<?php $this->permalink() ?>"><?php $this->title() ?></a>//文章标题和超链接 <a href="<?php $this->author->permalink(); ?>"><?php $this->author(); ?></a>//作者名称和超链接 <?php $this->date('F j, Y'); ?>//文章发布时间 <?php $this->category(','); ?>//文章分类 <?php $this->commentsNum('%d Comments'); ?>//评论数量 <?php $this->content('Continue Reading...'); ?>//阅读全文more语法截取缩略内容(可改为<?php $this->excerpt(140,'....'); ?>自动截取前140个字符,根据需要也可以改成 <?php $this->summary(); ?新版功能,自动输出内容中第一个块级元素中的内容>) <?php endwhile; ?>//循环结束 <?php else: ?>暂无与之相关文章<?php endif; ?>//判断结束翻页代码<?php $this->pageNav('上一页', '下一页', '5', '……'); ?>//显示多个页码的 <?php $this->pageLink('下一页','next'); ?> <?php $this->pageLink('上一页'); ?>//只显示上一页下一页页码显示当前页码:<?php if($this->_currentPage>1) echo $this->_currentPage; else echo 1;?> 总页码:<?php echo ceil($this->getTotal() / $this->parameter->pageSize); ?>文章全文显示<?php $this->content(); ?>登陆判断 <?php if($this->user->hasLogin()):?> 登陆才可以看到这里的内容 <?php endif;?>文章作者名称与主页地址<a href="<?php $this->author->permalink(); ?>"><?php $this->author(); ?></a>文章最后编辑时间<?php echo gmdate('Y-m-d H:i', $this->modified + Typecho_Widget::widget('Widget_Options')->timezone); ?>当前文章id<?php $this->cid(); ?>文章中的上一篇和下一篇<?php $this->title(); ?> //标题 <?php $this->category(','); ?> //分类 <?php $this->tags(', ', true, ''); ?> //标签 <?php $this->date('F jS, Y') ?> //时间 <?php $this->content(); ?> //内容 上一篇: <?php $this->thePrev('%s','没有了'); ?> 下一篇: <?php $this->theNext('%s','没有了'); ?>文章标签<?php $this->tags(', ', true, 'none'); ?> 说明:(', ', true, 'none')第一个单引号间的逗号代表标签与标签的间隔用逗号隔开,true是标签以超链接形式输出,none为该文章没有标签时显示的提示信息用户昵称<?php $this->user->screenName(); ?>后台地址与登陆地址<?php $this->options->adminUrl(); ?>//后台地址 <?php $this->options->adminUrl('login.php'); ?>//登陆地址文章rss和评论rss<a href="<?php $this->options->feedUrl(); ?>"><?php _e('文章 RSS'); ?></a> <a href="<?php $this->options->commentsFeedUrl(); ?>"><?php _e('评论 RSS'); ?></a>搜索代码<form method="post"> <p><input type="text" name="s" class="text" autofocus /></p> <p><button type="submit" class="submit"><?php _e('搜索'); ?></button></p></form>分类描述<?php echo $this->getDescription(); ?>随机标签云<?php $this->widget('Widget_Metas_Tag_Cloud', 'ignoreZeroCount=1&limit=30')->to($tags); ?> <ul class="tags-list"> <?php while($tags->next()): ?> <li><a style="color: rgb(<?php echo(rand(0, 255)); ?>, <?php echo(rand(0,255)); ?>, <?php echo(rand(0, 255)); ?>)" href="<?php $tags->permalink(); ?>" title='<?php $tags->name(); ?>'><?php $tags->name(); ?></a></li> <?php endwhile; ?> </ul>标签相关文章<?php $this->related(5)->to($relatedPosts); ?> <ul> <?php while ($relatedPosts->next()): ?> <li><a href="<?php $relatedPosts->permalink(); ?>" title="<?php $relatedPosts->title(); ?>"><?php $relatedPosts->title(); ?></a></li> <?php endwhile; ?> </ul>调用某分类文章,pageSize是数量,mid是分类号:<?php $this->widget('Widget_Archive@index', 'pageSize=6&type=category', 'mid=47′) ->parse('<li><a href="{permalink}">{title}</a></li>'); ?>首行缩进问题,加入css实现.post-content p{ text-indent: 2em; /*em是相对单位,2em即现在一个字大小的两倍*/ } 全部标签列表,按照MID排序<?php $this->widget('Widget_Metas_Tag_Cloud') ->to($taglist); ?><?php while($taglist->next()): ?>//循环输出 <a href="<?php $taglist->permalink(); ?>" title="<?php $taglist->name(); ?>"><?php $taglist->name(); ?></a> <?php endwhile; ?>//循环结束最新文章<?php $this->widget('Widget_Contents_Post_Recent')->to($post); ?> <?php while($post->next()): ?> <a href=”<?php $post->permalink(); ?>” title=”<?php $post->title(); ?>”> <?php $post->title(25, '…'); ?></a> <?php endwhile; ?>判断为当前页的第几篇文章,并单独输出内容<?php if ($this->sequence == 0): ?> //需要的插入 <?php endif; ?>神奇的is语法<?php if ($this->is('post')) : ?> 这里就是内容了 <?php endif; ?> typecho可以使用is语法判断很多东西,比如 $this->is('index'); $this->is('archive'); $this->is('single'); $this->is('page'); $this->is('post'); $this->is('category'); $this->is('tag'); 甚至是 $this->is('category', 'default'); $this->is('page', 'start'); $this->is('post', 1);Typecho 建站首页实现阅读全文Typecho自动显示摘要,200为自动摘要的字数。 1.<p><?php $this->excerpt(200); ?></p> 2.<p class="more"><a href="<?php $this->permalink() ?>" rel="bookmark" title="<?php $this->title() ?>">阅读全文</a></p>给网站添加返回顶部按钮<script src="https://ajax.googleapis.com/ajax/libs/jquery/3.3.1/jquery.min.js"></script> <script type="text/javascript">var scrolltotop={setting:{startline:100,scrollto:0,scrollduration:1e3,fadeduration:[500,100]},controlHTML:'<img src="https://i1155.photobucket.com/albums/p559/scrolltotop/arrow5.png" />',controlattrs:{offsetx:5,offsety:5},anchorkeyword:"#top",state:{isvisible:!1,shouldvisible:!1},scrollup:function(){this.cssfixedsupport||this.$control.css({opacity:0});var t=isNaN(this.setting.scrollto)?this.setting.scrollto:parseInt(this.setting.scrollto);t="string"==typeof t&&1==jQuery("#"+t).length?jQuery("#"+t).offset().top:0,this.$body.animate({scrollTop:t},this.setting.scrollduration)},keepfixed:function(){var t=jQuery(window),o=t.scrollLeft()+t.width()-this.$control.width()-this.controlattrs.offsetx,s=t.scrollTop()+t.height()-this.$control.height()-this.controlattrs.offsety;this.$control.css({left:o+"px",top:s+"px"})},togglecontrol:function(){var t=jQuery(window).scrollTop();this.cssfixedsupport||this.keepfixed(),this.state.shouldvisible=t>=this.setting.startline?!0:!1,this.state.shouldvisible&&!this.state.isvisible?(this.$control.stop().animate({opacity:1},this.setting.fadeduration[0]),this.state.isvisible=!0):0==this.state.shouldvisible&&this.state.isvisible&&(this.$control.stop().animate({opacity:0},this.setting.fadeduration[1]),this.state.isvisible=!1)},init:function(){jQuery(document).ready(function(t){var o=scrolltotop,s=document.all;o.cssfixedsupport=!s||s&&"CSS1Compat"==document.compatMode&&window.XMLHttpRequest,o.$body=t(window.opera?"CSS1Compat"==document.compatMode?"html":"body":"html,body"),o.$control=t('<div id="topcontrol">'+o.controlHTML+"</div>").css({position:o.cssfixedsupport?"fixed":"absolute",bottom:o.controlattrs.offsety,right:o.controlattrs.offsetx,opacity:0,cursor:"pointer"}).attr({title:"Scroll to Top"}).click(function(){return o.scrollup(),!1}).appendTo("body"),document.all&&!window.XMLHttpRequest&&""!=o.$control.text()&&o.$control.css({width:o.$control.width()}),o.togglecontrol(),t('a[href="'+o.anchorkeyword+'"]').click(function(){return o.scrollup(),!1}),t(window).bind("scroll resize",function(t){o.togglecontrol()})})}};scrolltotop.init(); </script> <noscript>Not seeing a <a href="https://www.scrolltotop.com/">Scroll to Top Button</a>? Go to our FAQ page for more info.</noscript>